Showing posts with label DIY Adventures. Show all posts

Dresser Upgrade - My latest article for YMM Magazine!

 6.4.14

I'm very excited to share with you all our latest DIY project! 

We gave a tired mid-century modern dresser a bit of an upgrade. It's been a couple years in the making (we got the whole bedroom set back in 2011 on Kijiji for $50!), deciding on what we'd do with this piece, and we're so happy with the results! 
 
 This is the wonderful "after" look!
We're in the midst of making over Little A's room, and this piece is perfect for her new room. 

Be sure to check out the full tutorial here from YMM Magazine, but I'll post some photos of the project here :)

This is the Before - cool mid-century tallboy with great details.

I absolutely adore the inside of the dresser - cool shelves and drawers! They don't make 'em like this anymore.
Another post-makeover photo. I just love this piece!
--------------------------------------------------------------------------------
I'm excited to share all the projects with you as we go. We are also making over our master bedroom and EZ's room too, so expect more fun DIY blog posts in the future!

Check out YMM for a full tutorial of the tallboy makeover!


Read more...

Master Ensuite Mini-Makeover :)

 5.9.13

We've been in our home for over a year now, and I wish were closer to being "done" with our decorating, but sometimes you have to live in a space for a time before you know exactly what to do with it. I am still pondering what to do with our Master Bedroom, but I knew that our Master Bathroom needed a little "oomph" and sparkle. 

This mini-makeover consisted of a new paint job {or two! see below!}, new mirrors {which I purchased 18 months ago}, and upgraded sparkly light fixtures {which I purchased a year ago}. This micro-update was indeed a long time coming! haha!
Big A was a hero again in this DIY adventure. Here's the short version of the makeover. I chose the above paint swatch 8 months ago {Benjamin Moore CSP-95 Sea Salt}, but never actually purchased the paint. On a whim a few weeks ago, we decided to just start painting over the dark taupe colour...except we didn't have the right paint colour. We had BM's White Down on hand which we used and loved in our old house, so I made the executive decision to use that paint. And I hated it in the space. It was too yellow-y and too creamy. I wanted a cool "greige" colour, and White Down was all wrong for this bathroom.  I tried to live with it for a couple of days, but I *hated* it and so we repainted it with Sea Salt and I couldn't be more delighted!

The original bathroom {which I didn't even snap a photo of because I'm so out of blogging practice!} had one bronze light fixture centred above the cabinets. It was fine, but it wasn't me. I convinced Big A that adding another light, one above each sink would add so much light to the room. Big A was a trooper, crawling into the attic to do all the electrical work, then measured and cut holes in the wall. He also had to mud the hole left from the old fixture. Lots of work, but SO worth it.

I am really enjoying the results. We still have a few more things to do -- a feature wall above the sinks, art and...{look away wood lovers...painting the wood cabinets gray. Trust me, it'll look FAB!

Read more...

Living Room Upgrade - Built-in Bookshelves! {Lots of Photos!}

 2.9.13

So like most of you, we've been really busy this summer. We've enjoyed the amazingly long days of summertime in Fort McMurray. We've traveled a bit, enjoyed our backyard and our new hot tub {yay!}, we bought a new truck {double yay!}, explored all the trails in our area on "nature walks" with the kiddos, and spent amazing quality time with family. 

Be sure to follow me on Instagram @mummymaggie to follow along in our day-to-day adventures :)

In all of this fun, we did manage to squeeze in a couple of DIY projects which I promise to post to this here bloggy blog. I guess this is the part of the post where I apologize profusely for being absent for so long. I am sorry. I missed you, my lovely readers. Thanks for understanding that life sometimes veers us of the blog-writing track, but we always come back :)

So without further ado...the Living Room Upgrade! Yes, I did give a bit of a teaser way back in March, and yes, it did take a LONG time to complete the project, but here we are. 

Not to "phone it in", but my "Do-It-Yourself, McMurray" article in the latest YMM Magazine is a feature on this project. Click here to check it out.

Here's the finished result! Ikea cabinets {originally for kitchens and bathrooms} repurposed into built-in bookshelves at a fraction of the cost. We choose sleek, high gloss white cabinets and modern stainless steel handles to set off the look.

This photo is the only one I could find of a "before".  It's from Aviva's 2nd birthday party, hence the festive pink balloons :) I love how this photo really shows how this space was a blank canvas, just waiting to be "Mummy Maggie-fied!"
An "in progress" shot, showing how quickly the awesome cabinets transformed the space as they were put up. I also want you to check out the seating. I originally had our two couches facing each other because I thought I was maximizing space. Oh, how wrong I was...see below :)

A close-up of the cabinets going up. Adair was a trooper to manage to configure these Ikea cabinets. Did you see the number of boxes from my teaser photo?! Ikea MADNESS!

Here's another "during" pic. I love how Ginger is just chilling on the couch with all the DIY craziness going on around her.


Here it is! After months {yep, it took months of stolen late nights after our kids went to bed -- and they go to sleep LATE!} of hard work -- our built-in bookshelf project is complete. We are so pleased with the results. I love the cabinets, but I especially love the tile work. It's thin strips of Carrera marble on 12 x 12 sheets. We decided to hang it vertically to maximize the height of the 9-foot ceilings, and then add strips of stainless steel tiles for visual interest. It looks amazing!

Here's another angle which highlights the change of the living room furniture configuration. This new layout created so much more space because it's open to the kitchen, so the couch at the bottom right of the photo distinguishes the space {and highlights the AMAZING chevron throw I scored at Urban Barn!}. It actually looks a bit different now, mostly because I can't leave well enough alone. But that's another post for another day :)
This last photo is a close-up of the cabinets. Adair truly put a lot of work into these babies, especially around the crown. He *had* to buy the right saw to cut the trim around the crown moulding. You can also see a bit of the close-up of fab tile work too. Thank you, Big A!
So...what do you think of our living room transformation? Was it work the wait?

Read more...

Living Room Addition - a Teaser!

 18.3.13

I love my new house.  We've been in for about 10 months now, so we're settling in more and more everyday.

What I don't love about my house is the lack of storage.  Or at least my perception of a lack of storage. Or maybe it's just that I've always dreamed of bookshelves flanking the fireplace in my living room, so my storage complaints are a big rouse to make that dream a reality.

Whatever the real story is, the built-in bookshelves in the living room are happening! We asked my interior design friend and Ikea Guru to help us figure out a custom look on a big box store budget.

We figured that customized built-in bookshelves would probably cost us about $8-10K, especially in Fort McMurray. But incredible Ikea "built-ins" {comprised of various kitchen cabinets & drawers!} came in at just a fraction of the cost -- even with having to rent a pick-up truck and drive 5 hours to Edmonton and back. And we are always up for a good ol' DIY project!
An Instagram shot of ALL the bazillion boxes that will make up our built-in bookshelves! It literally filled the whole back of the pick-up truck!
 The update would not be complete without a tile installation! We picked up the carrera marble skinny subway tiles at Home Depot! Yay for the "The Depot" as EZ calls it! Affordable and awesome!

I'm really excited about the cool veins of gray in these tiles. It's going to be fabulous! Especially because we're tiling them vertically for an unexpected twist!

It took awhile for Big A to put the cabinets and drawers together. Ikea stuff, even as awesome as it is, is notoriously annoying to put together. Especially with two little helpers in the form of small children who want to be extremely involved, the process can be a wee bit tedious. But Big A has persevered and everything is almost installed!

 Stay tuned for our latest living room updates!

Read more...

My 2nd Article in YMM Magazine!

 16.3.13

The latest issue of YMM Magazine is out!


Be sure to check out my article on the YMM Online Edition!

Let me know what you think!

Read more...

Life Update - Winter 2013

 15.3.13

Okay. Seriously. Where does the time go? It's been TWO WHOLE MONTHS since I last updated. Like everyone else on the planet, we're a busy family with lots going on. And frankly, after a working all day long and the hours-long drama of putting kidlets to bed, updating the blog late at night is a lot less interesting than vegging out with the Real Housewives of wherever. 

But I miss blogging. I miss recording our adventures. So here I am :)

Here's a bit of an update of the last two months:

DIY Home Projects:
  • We're making GREAT progress on the built-in bookshelves -- but I guess you don't even know about that, so that's a blog post in itself!
  • Remember this post from back in October about "Paint it Black"? I've been waiting for TWO months for wallpaper samples to finalize our choice because our bedroom is GOING BLACK! It'll be a huge master suite transformation that will include our room, ensuite bath AND our closet {but don't tell Big A that just yet!}
  • In the Spring, we're embarking on a play room makeover too. With space being a premium in our home, we need to make better use of that space :)
Family Life:
  • On top of my full-time work, my yoga teacher training, and motherhood -- I've decided to add GRAD STUDENT to my plate. Yep, that's right. I start my graduate studies on Monday! So excited!
  • Kids are wonderful -- they are growing up so fast, and they deserve their own post.
  • It's still FUH-REEZING in Fort McMurray - like it's -29 degrees celcius + windchill. And it snows almost everyday! We're really looking forward to Spring!!
  • Big A and I ventured to Puerto Vallarta, Mexico sans kiddos for a week back in February. It was as fabulous as you can imagine.
  • Yoga is now part of my life, not just something I do on weekends, and I couldn't be more grateful for the magic and power of Yoga in my life. I see it's effects rubbing off on my kidlets so I couldn't be a more happy swami mummy! 

So there you have it -- a brief overview of our busy life in #YMM. I am so incredibly grateful for our new life here in Fort McMurray. We're coming up on our one year anniversary of moving to #YMM. It was the best {albeit the CRAZIEST!} decision we ever made. Our lives have completely changed. We have met amazing people, had wonderful experiences, and have been blessed with more opportunities than we dreamed of -- and it's only been a year!     

Read more...

Our {latest!} Fort McMurray Real Estate Adventure...

 27.5.12

So...ya...we bought a house. 

Well, I'm probably jinxing it because all the conditions haven't been met yet, but it's *thisclose* so it's probably going to happen. And we're too excited to keep quiet about it anymore!


Obviously it's a new build, so we hope to move by the end of June. it's close to being done. Part of our contract is that the basement be made into a legal rental suite {EVERYONE does that here in Fort McMurray to offset the RIDICULOUS house prices!}.

Getting to the point where we actually purchased this house was quite the adventure. We saw no less than FIFTY houses of all sizes {1200 sq ft to 3300 sq ft in vast range of prices}. 

You KNOW that I love real estate, so I've been perusing MLS since Big A was offered the job here. I got the know the Fort McMurray real estate market pretty well. On the very day when we qualified for our mortgage, we set out to buy a specific house that day, only to realize it SOLD... that very day! It had been sitting on the market for 5 months and it SOLD the day we want to offer on it!

Unfazed, because I truly believe all things happen for a reason, we found another perfect house. We wanted to sleep on it, so we held off putting an offer for a day, only to find out that it too had SOLD within that short window! Of all the luck!

Soon we found another house -- which was going to be an exact replica of the first house I set my heart on.  But for some reason, I just wasn't sure I wanted to put an offer, so we slept on it again.

The next morning, my amazing Fort McMurray real estate agent {and now my soul sister!} texted me that she found the PERFECT house for me, in the neighbourhood I wanted, for a much more reasonable price. No catch. Seriously.

 As soon as we saw it, we knew THIS was the house. It was in the middle of construction, with only dry wall and a few doors, so we had to use our imagination. To make it more challenging, ALL the finishings had already been chosen and I had no real idea what they were. So once we got clarification on what the big ticket items looked like {cabinets, countertop, tile, etc.}, we took the plunge.

We are so glad we did. Look what we discovered when we came back from Ontario this week! The tile floors and kitchen cabinets are in!
Luckily, our builder is AWESOME and agreed to let us choose the hardwood, carpet, backsplash tile and basement flooring & countertops. It's so exciting to be able to customize this awesome house on these important aspects of our home.

And wait till you see what we picked! We're taking a bit of a risk, but I LOVE it! It's GORGEOUS!

One thing that we really love about buying THIS home in particular is that it isn't ALL done. We're not paying for someone's design/decorating/customization. 

We are going to be able to really make this house OUR HOME. 

Bring on the DIY! Did I mention the garage is HEATED?!?!?!

Stay tuned for our more updates on our new home!

Read more...

Year of Epic Makeovers: The Best of 2011

 28.12.11

So many amazing transformations took place in our home in 2011! From simple projects to entire room makeovers, 2011 was a year of FUN & Budget-friendly DIY transformations.

Here are the highlights from our 2011 DIY Adventures in Home Improvement & Decorating!

***
The Dining Room & Conversation Area
This Transformation post is from May 2011 - more has since been added {like the painted mirrorWest Elm curtains and the reupholstered bergere chairs - see below too!}.

***

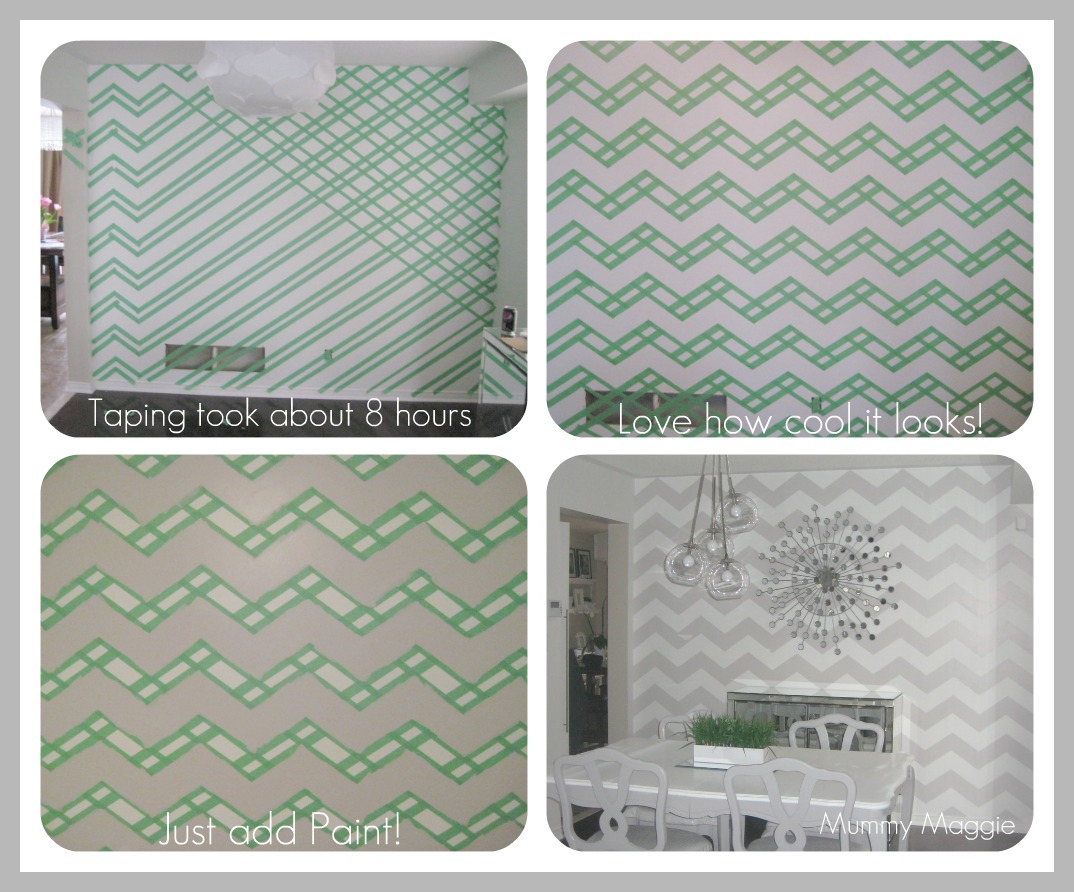
The Amazing Chevron Wall
This was an amazing project because I truly realized the power of paint. We had originally wanted to wallpaper the wall, but it was too expensive. My beloved zig-zags added the perfect punch to a dull white box of a room!


 ***

The Kitchen Transformation
For details of this amazing transformation, click here for the full post! We've also recently added under-cabinet lighting - what a HUGE difference that makes too! I'm so thankful for a handy and talented hubby!


*** 

Little A's Room: Modern Nursery Chic
I am IN LOVE with Little A's fun & girly {without being baby-ish!} nursery. If we move, I'm going to have to re-create this room! Here's a link to the original post and a follow up post where I did some Dollar Store DIY art!
***

Spray Painted Door Knobs
I love this project because it's SO easy & fast and creates a HIGH IMPACT for little effort! It's spray paint. And it's AWESOME. Click here for the full post/tutorial.
***

Modern Moroccan Master Bedroom Updates
It didn't take much beyond paint, light linens & a vision to create this relaxing Master Bedroom Retreat! The furniture, rug & even the West Elm sofette was found through Kijiji - so this room is chic and VERY budget-friendly!

***

The Family Room
We turned our 4th bedroom into an upstairs family room! Click here & here for how we did it!
 ***

Simple Chair Transformation
This was a simple DIY project - my 1st attempt @ upholstery. Click here for the full post!
 ***

EZ's Room: Modern Zoom Zoom Zoom!
EZ's room is very kid-friendly, but not too childish. The wall treatment was done by Big A - and he did an AMAZING job! It adds a lot of architectural interest to an otherwise builder's box of a room :)

The DIY Alphabet Wall was done with letters from the dollar store! Click here for the tutorial!

***
Bergere Chairs
We're *almost* finished this now-gorgeous chairs, but this was indeed an epic transformation that completed the conversation area in our dining room!
 ***

The Entry Way
Our entry way went from being EMPTY to several changes itself this year. We added a bench & a large rug, framed photos, a new light fixture, drapes, painted the door black, then changed the bench to a console table -- I love to have a flat surface at the front entry!


***

Spice Organization
This was an easy little project, but I LOVED it because it made my spices so accessible which comes in handy since I'm cooking more since becoming vegan.

***

Bulletin Board Upgrade
Click here for the tutorial!

 Whew! We've had a busy DIY-ing year! I've probably missed a few, but I hope you've enjoyed our Year of Epic Makeovers!

Thank you so much for following along in our DIY adventures & madness! Thank you for the blog love and all your comments mean A LOT to us. 

Linking up to:

Southern Hospitality's Top Projects of 2011


Passionately Perfect's Coffee & a Conversation #19

It's Overflowing's Overflowing with Creativity #2

Space 46's Best of 2011 Made Up & Loved Linky Party

Read more...

EZ's Room Reveal!

 26.12.11

I've been meaning to post this for quite some time. I've been waiting until it's perfect, but a well-decorated room is one that is layered over time. And this decorating process could go on for ages, so I thought I'd just post where we are NOW with EZ's room.


EZ LOVES his room. Anyone that comes over must venture up to his room so he can show off his space. 

The room is kind of awkward for photo taking -- it's hard to fit everything in. This is the view from the door.

Here are some Before & After pics so you can see how far this room as come!


A close-up of the wall art. A friend sent these jpegs to me - and they are a perfect match! They are from www.oohmoon.com -- she offers one free digital art design every day. So my wonderful friend saw these and saved them for me :) Am I lucky or what? So yes, they were FREE -- all I had to do was print & frame them.

EZ loves his orange club chair. It's perfect for reading stories. He also ADORES his globe with the plane on top, which I picked up a couple months ago at HomeSense for $30. Sometimes, even now, when I tuck him into bed, he'll stop and say thank you for getting him the plane. He says, "Thanks mum. That's my plane."

Of course, the awesome and easy DIY alphabet wall. EZ loves looking at this. He "helped" put it up, which he likes to tell everyone too! 


I picked up these round bath mats a few years ago at Ikea for $6 a pop. I love how they add a pop of colour, without totally covering the floor like an area rug. They are fun & durable too!

 I hope you enjoyed the little tour of EZ's new room. I still have a few projects planned for his room, but all our DIY projects are on hold for a bit until we sort out our BIG PLANS for 2012!

Linking up to:

Not Just a Housewife's Best DIY Project of 2011 Contest

Read more...
Related Posts Plugin for WordPress, Blogger...

Blog template by simplyfabulousbloggertemplates.com

Back to TOP